Friday, 1 November 2013

Elegant Christmas


Hi and Good Morning everyone :) 

First of all I would like to thank everyone who sent me birthday cards and gifts!  It is so much appreciated, and I was blown away :)   Thank you! 

My card today showcases some of Cheery Lynn  Designs most fabulous and elegant Christmas Dies!
 
I started off with a 6 x 6 scalloped blank card base and layered deep red DCWV cardstock and Bo Bunny paper, and then had a blast cutting the gorgeous festive designs.
 
The back panel has the snowflake mesh border overlaying the striped paper, and also the gorgeous Holly Lace Flourish.  I then stuck down the second mat and paper and added the stunning Christmas Star Tree using the angel wing to back in red card for impact.
 
I added the Holly corner, Merry christmas sentiment, and then combined Alisons Ribbons and the star strip from the Expandable Tiny Borders
 
I used the poinsetta flower strip for 3 quick and easy christmas flowers, and these are held together with pearl brads.  I then added some deep red berry pearls and some ice white pearls for a finishing frosty touch.
 
All dies used on this card are:

DL247 - Christmas Star Tree
B372 - Snowflake Mesh Border
B324 - Poinsetta Strip
B186 - Merry Christmas Set
B184 - Holly Corner
B335 - Alisons Ribbons
B215 - Expendable Tiny Borders
B148 - Holly Lace Flourish

Thanks so much for visiting my blog today, and I hope you found time to enter our challenge this week where I theme is Borders and Edgers.

Have a smashing week!


Friday, 25 October 2013

Hearts & Gears


Hi and Good Morning :)  Todays card showcases some of the stunning  Cheery Lynn Designs  Steampunk Dies!

This card is a glorious 8 x 8 inches, so a brilliant size to showcase the intricacy an detail of these dies, instead of much of them being concealed by a main image as a focal point.

Now, I had such fun making this card!  It was great to dig out some much neglected (and much maligned) silver mirri board to create a dazzling metallic effect to this design.   I layered HOTP paper and bazzil card, applying DI inks to the edges.

I created the breathtaking Gear Mesh border by matting silver card onto grey card and adding additional gears, silver stud pearls and brads.  I cut the beautiful new Daphne Doily in grey card, and used silver card to cut the Hearts n Gears to create a background for my image.  I  then matted the Kenny K digital stamp onto Silver Square Stackers and Scalloped Square stackers and added the pretty Lock and Keys and Love sentiment for a finishing touch.

All dies used on this card are:

B361 - Gear Mesh Border
B378 - Hearts n Gears
B340 - Gears
B350 - Lock and keys
DL264 - Daphne Doily
B227 - Love sentiment
L-1 - Square Classic
XL-2 - Square Scalloped Stackers

Thanks so much for visiting my blog today, and I hope you find time to join in this weeks challenge where our theme is vintage.

Have a smashing week!


Friday, 18 October 2013

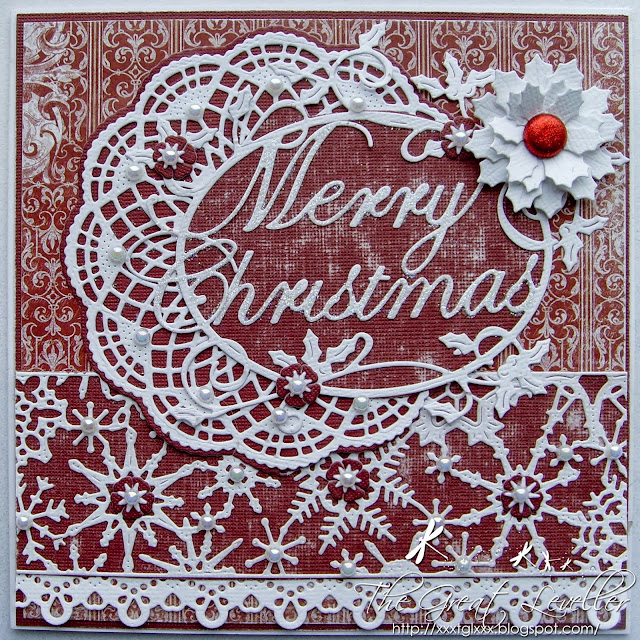
Cheery Lynn New Release Christmas Dies


Hi and Good Morning everyone! :) Wow what a fabulous week of inspiration we have had so far showcasing all the gorgeous new Cheery Lynn Designs new releases for October!

My card today shows off the intricacy and elegance of just a few of the new designs, but what a big impact they have!

I started off with a 6 x 6 inch blank card base, and layered DCWV red bazzil cardstock and Bo Bunny paper.  I then used the gorgeous new snowflake mesh border die, cut it in bright white and matted onto sanded red card.  I edged this with the new Siena double edged border and added a few tiny flowers and pearls to the centres of the snowflakes.

The main Merry Christmas sentiment is backed onto red sanded card too, and also matted on the the stunning Lilith Doily.  Again I backed this with red card cut from the matching angel wing.

For a finishing touch, I made a poinsetta flower, and secured with a glitter brad, and added a few more tiny flowers, pearls and ice glitter.

All dies used on this card are:

B366 - Merry Christmas Holly Sentiment
DL263 - Lilith Doily with Angel Wing
B372 - Snowflake mesh border
B373 - Siena double edged border
B324 - Poinsetta flower strip
B376 - Tiny flowers

Thanks so much for visiting my blog today, and  if you find time why not visit our Cheery Lynn Designs Blog for more wonderful inspiration from our very talented DT.

Have a smashing week!


Tuesday, 15 October 2013

Cheery Lynn Designs - New Release Dies!!


Hi and Good Morning :)

Well today sees the launch of the Cheery Lynn Designs new release dies, and they are all amazing! :)  An awesome collection of diverse dies, from seasonal, themed, ornate stackers and doilies and some super-cute mushrooms, flourishes and flowers.
 
My card today uses the Horizon French Flair Boutique stackers double layered for effect, and the main centrepiece is the stunning Lattice Heart and Vines.  Tucked behind the main stacker is the pretty new Siena Double Edged border, this is going to be a winner!
 
I added the Tiny Fanciful Flourishes to the corrners, and placed extra flowers on the heart for depth, and added the 'Kisses' word sentiment and some opal pearls for a finishing touch.

All dies used on this card are:

*New - DL271 - Horizon French Flair Boutique Stacker
*New - B368 - Lattice Heart & Vines
*New - B387 - Tiny Fanciful Flourish (Left and Right)
*New - B382 - Kisses Sentiment
*New - B373 - Siena Double Edge Border
*New - B376 - Tiny Flower Kit - Set of 3 designs
XL-13 - French Flair Scalloped stackers
L12 - French Flair Silver Stackers

Please visit the Cheery Lynn Designs blog to see some more gorgeous designs featuring our new dies made by the rest of the incredibly talented DT!! :)

Have a Smashing Day


Friday, 11 October 2013

Lilac Faery Dreams


Hi and Good Morning :)  

Now wasnt this picture taken in the last of the summer rays ? lol :) 

So todays card is inspired by some more gorgeous and easy to use Cheery Lynn Designs Dies, and a desire to cling to the fresh and bright hues of spring and summer! lol

I started off using a blank 6 x 6 card base, and layered white american crafts cardstock with some scraps of lilac paper.  This cardstock  was used for all the die cuts, and it cuts like a dream.

I then created my background using the elegant  Daisy Lace Frame, and edged it with the Lady Kate Edger.  I then stuck down 2 strips from Alisons Ribbons to conceal the join.  I coloured my image with PM's and glittered the wings, and matted onto oval stackers and scalloped oval stackers.

I made the lovely sweet flowers using the  Daisy Strip die (my favourite flower die ever!) and secured with pearl and glitter brads.  The pretty dragonfly and olive branch leaves were added as a finishing touch, along with some white pearls.

All dies used on this card are:

FRM118 - Daisy Lace Frame
B278 - Lady Kate Edger
B335 - Alisons Ribbons
B259 - Daisy Strip
DL152 - Dragonfly
B147 - Olive branches
L-7 - Oval Stackers
XL - 8 Scalloped Oval

Thanks so much for visiting my blog today, and I hope to see some fabulous entries in our Halloween Challenge this week.

Now... time for a grovelling apology.. :(  Most of you will notice I have been missing in blogland for a few months.. this is due to my long standing internet connection issues and supplier.
As I have referred to often, we live very rural, and traditional internet is not an option for us, as we have no telephones or landlines, and therefore satellite internet is all we can obtain.  Recently,though, the satellite company Avanti, sold us onto another company - QSat, and to be very honest, their prices and packages are appaling! :(  Extortionate would be a better word!


I cannot justify upgrading and paying £50 a month to get only 15gig usage, when most people would use that in a week!.. So.. on their lowest package that I am, (512kbps) I have to make a very small and meagre allowance last a month, and it just doesnt work.  It cannot oftentimes even load a picture on a blog, so as much as I love visiting, I cant see anything but red x's :(  I have almost quit blogging, and as you will also have noticed, I have stood down from many DT's that I loved, and also am unable to leave comments or visit blogs as my internet is virtually broken.  I am hoping that there is some light at the end of the tunnel, and that eventually we can get internet by other means, but until then, im kinda stuck. :( 
 
My biggest apologies to my dearest blogging friends.. I miss you all so much! and your visits still mean the world to me :) As soon as I am back on a proper speed, I will be back with a bang! :)
 
but until then... have a smashing day and thank you all so much for your support!
 
hugs


Monday, 7 October 2013

Christmas Frost


Hi and Good Morning :)  Today I am sharing a frosty christmas card created using some amazing, quick and easy Cheery Lynn Designs Dies!

I started off with a blank 6 x 6 inch card base and added a piece of pearl and silver vellum for my base.  I then cut the gorgeous Winter Neighbourhood Border and shadowed it with a piece of ice blue paper.  The pretty corners were created using the Holly Corner die, sticking some icy pearls for the berries. 

I coloured my LOTV image with PM's and FM's and glittered the snow and highlights.  The image was layered on Scalloped square stackers and Horizon boutique stacker, and I added the adorable Santa Sleigh & Reindeer.  This is just so delicate and sweet!

For a finishing touch I added a lacey Snowflower on the corner of the image, and the Christmas sentiment at the bottom.

All dies used on this card are:

B323 - Winter Neighbourhood
B184 - Holly Corner
B186 - Christmas sentiment
B326 - Santa's Sleigh and Reindeer
DL253 - Horizon Square Boutique Stackers
XL-2 - Scalloped Square Nesting Dies
L-1 - Silver Square Stackers
DL226 - Snowflowers 2


Thanks so much for visiting my blog today, and I hope you find time to join us in our weekly challenge, where this week our theme is 'Halloween!'. Boo!

Have a smashing week!,


Friday, 27 September 2013

Steampunk Dies


Hi and Good Morning! :)  Todays card was inspired by some of the amazing Cheery Lynn Designs Steampunk Dies! 

I used a 6 x 6 inch blank card base and layered black bazzil card and MME paper, inking the edges slightly with DI.

I then cut the stunning Steampunk Clock die in metallic black and stainless steel card, and shadowed it for effect.  The image is a Kenny K digi stamp and she was coloured in PM's and backed with Steampunk Wings.  I matted and layered onto Circle Stacker and Scalloped circle stacker.

The Gears were also cut in a mix of silver and black and layered and fastened together with silver brads for a finishing touch.

All dies used on this card are:

B357 - Clock with Angel Wing - Steampunk
B340 - Gears
B359 - Steampunk Wings
XL-5 - Scalloped circle stackers
L-4 - Circle Stackers

Thanks so much for visiting my blog today, I will be posting an update on my internet woes, and lack of blogging later in the week.. :( Thank you so much for bearing with me, I miss visiting you all so much!

Have a smashing day,


Thursday, 19 September 2013

Birthday Gift


Hi and Good Morning everyone, :)  Well in my part of the world, the summer has ended, and autumn fast approaches with a change in colours as well as the weather.  So todays card is a little more subtle in its hues, and uses some lovely Cheery Lynn Designs Dies.
 
I started off with a 6 x 6 inch blank card base and layered MME papers and white american crafts cardstock.  All dies were cut with this card too.
 
I cut the Tiny Bubbles border and stuck on the apricot top layer panel and also used the gorgeous Cape Cod Doily behind my image.  This is so delicate and beautiful, but cuts like a dream!  My image is matted and layered onto Square Stackers, Scalloped squares and the delighful  Horizon Square Stacker
 
I used Alisons Ribbons along the bubble border, and added a small strip of ric-rac ribbon on top.  The flower was made from the quick and easy Shasta Daisy strip, held together with a pearl brad, and for a finishing touch I added a dragonfly and some pearls.
 
All dies used on this card are
 
 
Thanks so much for visiting my blog today, and I hope you find time to enter our challenge this week where our theme is Things with Wings.
 
Have a smashing day!


Saturday, 14 September 2013

The Most Beautiful Border Die. Ever!


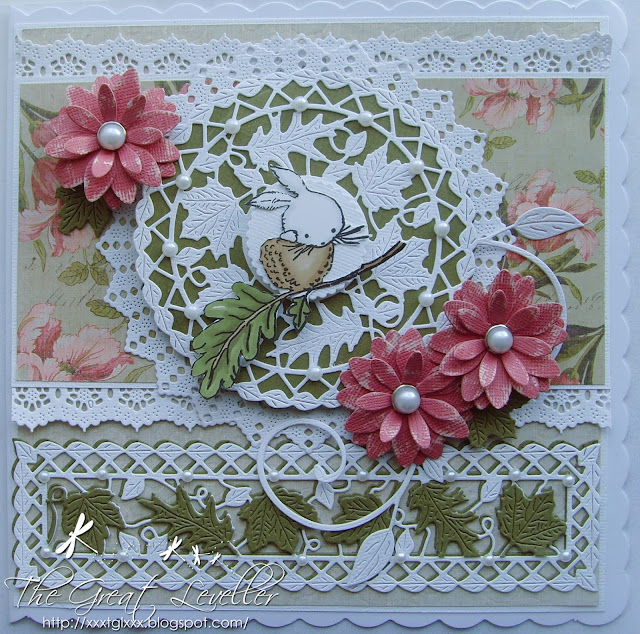
Hi and Good Morning everyone, back again today, sharing another card created and inspired by so many gorgeous Cheery Lynn Designs dies. :)

I used an 8 x 8 inch blank card base for this card, and layered K&Co papers and white American Crafts cardstock, and a stamped image from Lili of the Valley.

I created the bottom border using in my opinion, the Most Beautiful Border Die. Ever! - Fall Leaf Mesh Border, its just stunning.  I layered it to shadow against green cardstock, and also added an additional layer of leaves in green for contrast.  The top paper panel is edged in the Anastasia Lace border, and and the base doily is the Sunflower Doily.  My image is matted onto the matching Fall Leaf Doily, and backed with green card cut from the angel wing included.

I created the flowers using the Black Eyed Susan flower strip and the smaller petals are from the Daisy Flower strip.  I sanded this coral coloured card to soften and add shading.  Finally I added some pearls for a little bit of bling.

All dies used on this card are:

B325 - Fall Leaf Mesh Border
DL249 - Fall Leaf Doily
B338 - Black Eyed Susan Flower Strip
B259 - Daisy Flower Strip
B117 - Fanciful Flourish
DL181 - Large Sunflower Doily
B136 - Anastasia Lace Border.

Thanks so much for visiting my blog today, and I hope you have a smashing week!


Wednesday, 28 August 2013

Frosticles


Hi and Good Morning  :)  This week over on the Cheery Lynn Designs blog I am  sharing a Christmas card created using more of the gorgeous new release dies from Cheery Lynn Designs.

I used a 7 x 5 blank card base for this, and I cut a strip vertically from the front panel, so it shows the underneath of the card.  I used some of my favourite frosty printed card on the front and inside, and then attached the beautiful Tiffany Border for a lacey edge.

I coloured my image with PM's, and matted and layered onto Oval Stackers and Scalloped oval stackers and cut the Italian Flourish doily (which looks like a beautiful snowflake to me) in half to frame the oval with a delicate background. 

The bottom of the card is decorated with the stunning Winter Neighbourhood Border and the top of the card shows the fabulous Santa's Sleigh & Reindeer.  The white poinsetta flowers were inked delicately with blue and dipped into frosty glitter, and I added snow paste, glitter and pearls for a finishing touch.

All dies used on this card are:

B324 - Poinsetta Flower Strip
B137 - Tiffany Border
B326 - Santa's Sleigh and Reindeer
B323 Winter Neighbourhood Border
DL103 - Italian Flourish Doily
L-7 - Oval Stackers
XL - 8 - Oval Scalloped Stackers

Thanks so much for visiting my blog today, and I hope you find time to join us in our challenge where our theme is Frame It.

Have a smashing week!


Thursday, 22 August 2013

Summer Bouquet


Hi and Good Morning everyone, today over on the Cheery Lynn Designs Blog I am sharing more inspiration using some of the gorgeous new release Cheery Lynn Designs dies, as well as some of my favourite classic dies too! :)
 
I used a 6 x 6 blank card base, and layered K&Co papers onto white bazzill card.  I placed the gorgeous Dainty Dutch Deco Doily, on top of the base layer of paper and added die cut square and scalloped square mats. 
 
I made the border using the brilliant Alisons's Ribbons (these are so versatile!) and layered the Sophias Heart Border on top.  I coloured my image in PM's and matted it onto the oval scalloped and oval silver stackers, and the stunning new Horizon Oval Boutique Frames. 
 
The heart embellishment was created using 2 layers of the different sized Two of Hearts, and I cut a contrasting piece of paper for the centre heart too.  I added a super-cute bumble bee and also my signature butterfly (Oh.. I use this butterfly on everything!).
 
The pretty flowers were made from the quick and easy Sweet Williams Strip secured with a pearl brad, and I added some leaves, pearls and a pin for a finishing touch.

All dies used on this card are:

DL141 - Dainty Dutch Deco Doily
XL-2 - Scalloped Square Stackers
L-1 - Classic Square Silver Stackers
B335 - Alisons Ribbons
B333 - Sophias Heart Border
DL252 - Horizon Oval Boutique Stackers
L-7 - Oval Classic Stackers
XL-8 - Oval Scalloped Stackers
B241 - Rose Leaf Strip
B178 - Flourish Leaf Strip
B307 - Sweet Williams Strip
DL128 - Two of Hearts
B266 - Tiny Things with Wings
DL112 - Small Exotic Butterflies

Thanks so much for visiting my blog today, and I hope you find time to join in our challenge this week where our theme is 'Doilies'. 

Have a smashing week!


Wednesday, 14 August 2013

Hello


Hi and Good Morning everyone :)  Today over on the Cheery Lynn Designs Blog I am sharing a card I made using some of the gorgeous new release dies and my favourite 'Alison's Ribbons'! :)

I started off with a 6 x 6" blank card base and layered american crafts cardstock and K&Co papers.  I created the side panel by adding the oh so pretty Ankara Lace Border to each side, and then adding some gorgeous flourishes, butterflies and flowers.

I made the  ribbon border using scraps of left over card and paper and attached to the side.  I coloured my main image and matted and layered using circle stacker and scalloped dies, and then placed it on top of the stunning  Priscilla Doily.

For a finishing touch I added the Hello sentiment, and some grey blue pearls from stash.

All dies used on this card are:

B346 - Hello
B188 - Build a Flower Embellishment ~2
DL112 - Exotic Butterfly Small
B291 - Mini fanciful Flourish R
B117S - Mini Fanciful Flourish
DL260 - Priscilla Doily
L-4 - Silver Stacker Circles
XL-5 - Scalloped Circles
B335 - Alisons Ribbons
B332 - Ankara Lace Border

Thanks so much for visiting my blog today, and I hope you find time to join in our challenge where this week our theme is 'Fun with Letters'.

Have a smashing week,


Wednesday, 7 August 2013

Cheery Lynn Step Card Die


Hi and Good Morning everyone.  Today over on the Cheery Lynn Designs Blog, I am sharing a  Step card created using the awesome template die by Cheery Lynn Designs.   Its absolutely brilliant!

I started  off with some 320gsm A4 white cardstock, and cut the main die shape.  I folded along the embossed lines and 'TaDa'.. it was magically transformed into a blank Step Card!

All the layering dies for decorating are included in the set, and so this is where the fun really begins.

I took 3 sheets of matching K&Co paper, and cut the back, front and side panels along with the bottom border.  I then layered these die cuts onto contrasting paper and card, creating a matt and layered effect.

I trimmed the bottom front border with the elegant Sophias Heart border, butterfly and pearls.  The side panels were decorated with the Ankara Lace Border.

I coloured a Crafts & Me digi image and matted onto coved rectangle and scalloped rectangle mats, and then placed onto the Horizon Coved Rectangle.

I stuck the gorgeous Cape Cod Doily onto the front panel and layered my image on top.

For a finishing touch I made 2 flowers from the gorgeous gardenia strip and added some beautiful Olive branches and leaves.

All dies used on this card are:

B348 - Step Card #1
DL250 - Cape Cod Doily
B339 - Gardenia  Strip
DL113AB - Small Exotic Butterflies
L-10 - Silver Stacker Coved Rectangle
XL-11 - Coved Scalloped Rectangle
B332 - Ankara Lace Border
B333 - Sophia'sHeart Border
DL251 - Horizon Coved Doily Stacker
B147 - Olive Branches
D133 - Dimensional Small Leaves


Thanks so much for visiting my blog today, and I do hope you find time to join us in our challenge this week, where we have an 'Anything Goes' theme!

Have a smashing week!


Wednesday, 31 July 2013

Boo 2!!


Hi and good morning everyone, today over on the Cheery Lynn Designs blog I am sharing a Halloween card made using some of the new release dies from Cheery Lynn and also a couple of older dies too.

I started off with a 6 x 6 inch blank card base, and layered black bazzil card, silver card and and glitter paper. 

I then added the stunning and delicate spiderweb mesh border (which cuts like dream), and matted and framed my image onto the gorgeous Celtic Square Stacker.

I placed on top of my image the super-cute Witch's Laundry... this is such FUN! and for a finishing touch added a few bats and the sentiment Halloween.

All dies used on this card are
B322 - Spider Web Mesh Border
DL259 - Celtic Square Frames
L-1 - Silver Square Stackers
B334 - Witch's Laundry
B344 - Halloween
A194 - Going Batty

Thanks so much for visiting my blog today and dont forget there is still plenty of time to enter this weeks challenge of  'Hot Time in the Summer' where the lucky winner will receive an online voucher to spend in the Cheery Lynn Store!  :)

Have a smashing week,


Thursday, 25 July 2013

Matchbox Dies


Hi and Good Morning, I hope everyone is having a great week so far!

This week I wanted to show you how quick and easy it is to make a gorgeous wee gift box out of the Cheery Lynn Designs matchbox dies.

I used the largest Matchbox Die set for this gift box, and cut out 2 pieces in matching double sided 12 x 12 patterned paper.  I assembled the box quick and easily, as all the folds are embossed and it just all falls into place so well! :) 

I then decorated the sides of the box with  Sophias Heart border, and the Forever sentiment.

 
The top of the box is decorated with the matching Sophias Heart Mini Doily, and I made the flower from one of the new release floral strips Gardenia.  I held this together with a pearl brad and added some olive green leaves cut from the Rose Leaf Strip.
 
 
This was such a lovely gift box to make, and so easy too, I can see lots of uses for this die and all the other sizes to make a set!
 
All dies used are:
 
 
Thanks so much for visiting my blog today, and I hope you find time to enter our challenge this week where our theme is Silver and/or Gold, or see more gorgeous inspiration from the rest of the DT over on our Cheery Lynn Designs Inspiration blog.
 
Have a smashing week,


LinkWithin

Related Posts Plugin for WordPress, Blogger...